 IMAGE 2 (size each picture A4)
Reworked design idea for metallic final assessment piece.
Design idea from copper tree in fountain at Chelsea flower show. Outline structure on bottom picture.
IMAGE 2 (size each picture A4)
Reworked design idea for metallic final assessment piece.
Design idea from copper tree in fountain at Chelsea flower show. Outline structure on bottom picture.
 IMAGE 3 (SIZE A3)
Individual metallic painted leaves applied to outline structure
. Design curved to represent blowing in the wind linking in with original ideas previously presented. CHAPTER 8 TO THE EDGE
 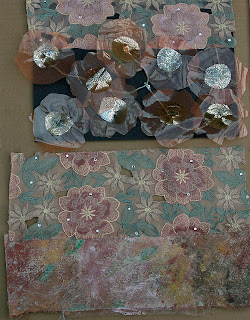 IMAGE 5 (SIZE each sample A4)
 IMAGE 6 (SIZE A5)
 CHAPTER 8 TO THE EDGE
 IMAGE 4 (SIZE each sample A4)
Using a richly embroidered textile sample, 4 different design interpretations were added.
In the top sample of this image ,florists' cellophane and gold film was cut into flower shapes and applied to a black paper background. Connecting stems were made from covered wire.
In the bottom sample bondaweb was painted to give a more impressionistic
interpretation of the original fabric sample. The leaves were then drawn on in greater definition using oil pastel.
 IMAGE 5 (SIZE each sample A4)
In the top sample, copper ageing/tarnishing paint was used on thin card as a base colour, with the green effects obtained by the application of ageing solution. Gold acrylic paints were used for other highlights.
The bottom sample was worked in oil pastels on black paper. The paper was first placed over a plastic grid to replicate the openwork lace of the original sample. Individual flowers and leaves were then applied, again with oil pastel ,and gold wax crayon for highlighting.
 IMAGE 6 (SIZE A5)
A fine wool sample in shades of red and beige was frayed at each end. The frayed sections wer then re-applied and secured by seam binding through the centre of the sample.  IMAGE 7 (SIZE ,TOP SAMPLE A5 BOTTOM SAMPLE 13 INS X 4INS)
  IMAGE 8 (SIZE A4)
 IMAGE 7 (SIZE ,TOP SAMPLE A5 BOTTOM SAMPLE 13 INS X 4INS)
The top sample was made from a fabric which I constructed from silk throwsters waste in black and gold. The sample was then faced/lined and bound around the edge. Stencil cut black organza flowers were then added around the edge, with a black bead at the centre of each flower. Skeleton leaves were then appliqued on and a machine embroidery butterfly was made for decoration.
The bottom sample was made from an offcut of the background black and white silk which was frayed out. The weft threads were used to form the flowers and the warp threads (which were very much stiffer) were then bunched together to separate the flowers. Black sequins were then applied to the flowers. The flowers were stitched to white broderie anglaise mounted on milliner's veiling and the whole was then appled to the same black and white silk fabric.
 IMAGE 8 (SIZE A4)
A honeycombe pattern was made in a cotton fabric using half inch tucks which were then caught together at regular intervals, offset across the fabric. The edge was bound with dyed scrim which was used to cover quilt wadding which was then wound with red wire. The bottom section was made from offcuts of a variety of white fancy yarns which I dyed using procion dyes in three colours of red. The different composition of the yarns meant that they each took on a slightly different colour from the dyes. The threads were then mounted on a glue fabric in a dense pattern at the top of the sample and gradually teased out to form a more openwork effect at the bottom.
 IMAGE 9 SIZE (each sample A4)
 IMAGE 10 (SIZE A3 OVERALL)
 IMAGE 9 SIZE (each sample A4)
The two samples were made from the same fabric which I achieved by gluing a mixure of commercial and home dyed threads on to glue fabric. Each sample related to my overall shoreline theme. The top sample included sections of casette tape and was overworked with hand applied sequins to give an impression of different colours glinting in a sandy/pebbly shoreline.
For the bottom sample I cut and stitched shell shapes and applied them as a facing to a plain beige background.
 IMAGE 10 (SIZE A3 OVERALL)
The top sample is a double edged faced flounce mounted on dyed /printed black and white cotton organdie made at Summer School
The bottom sample is a faced edge using fabric made in the method described in image 8 but using blue dyes. The fabric was then cut into wave like shapes, linked in overlapping rows to from a faced edge. The curved surfaces were then hand stitched with a loose buttonhole stitch in thicker white thread.
 The right hand sample is a series of assymetrical flounces closely grouped together and stitched through their centres on to a stip of cotton fabric
IMAGE 11 (SIZE OF EACH INDIVIDUAL SAMPLE A5)
The right hand sample is a series of assymetrical flounces closely grouped together and stitched through their centres on to a stip of cotton fabric
IMAGE 11 (SIZE OF EACH INDIVIDUAL SAMPLE A5)
 IMAGE 12 (SIZE EACH SAMPLE A5)
 IMAGE 13 (SIZE, EACH SAMPLE A5)
 IMAGE 14 (SIZE each sample A4)
  IMAGE 15 (SIZE each sample A4)
 The right hand sample is a series of assymetrical flounces closely grouped together and stitched through their centres on to a stip of cotton fabric
IMAGE 11 (SIZE OF EACH INDIVIDUAL SAMPLE A5)
The right hand sample is a series of assymetrical flounces closely grouped together and stitched through their centres on to a stip of cotton fabric
IMAGE 11 (SIZE OF EACH INDIVIDUAL SAMPLE A5)
The top sample is a fragment of fabric which I constructed with the addition of a stitched edge using some of the original fabric threads . this was worked on soluble fabric which was then subsequently washed away to leave an open work design.
The bottom sample is a fragment of furnishing silk which has elements of a Paisley design. Individual paisley motifs were then stitched on to black fabric shapes using a textured gold thread in the bobbin. The shapes were then applied along the edge.
 IMAGE 12 (SIZE EACH SAMPLE A5)
In the top sample a striped metallic fabric was edged with a thin coil of copper wire and then triangles were knitted down from the wire using a sparkly toning metallic yarn.
In the bottom sample a fragment of silk was extended by working machine stitching in toning shades and larger ,but similar, motifs on soluble fabric within an embroidery frame. The fabric was then washed away and the stitched sample attached to the original.
 IMAGE 13 (SIZE, EACH SAMPLE A5)
The top sample is in three pieces . The top is stiffened silk overworked by machine stitching. This is bound to a section of the same silk which was worked with fine piped pintucks. The piping cords were allowed to overhang the edge of the sample and were then enhanced by loops of fancy white yarn.
The middle green and white sample is a fragment of silk faced by white felt on to which pale green organza was secured by a series of machine stitched patterns. The organza was then cut away from some sections of felt , leaving others intact.
The bottom sample was a section of printed needlecord ,faced by dark brown lining. The lining was stitched into in a series of circles, secured to the needlecord by 'stalks'. The circles were then covered with frayed chenille/silk yarns and the connecting sections were cut away.
..
 IMAGE 14 (SIZE each sample A4)
The top green sample was a length of gross-grain ribbon faced with an insertion made from chiffon ribbon woven through lengths of cord wound around a frame. The bottom edge is formed by the application of squares of toning chiffon and these are replicated along the top ribbon.
The bottom sample is again a three stage insertion. The centre section is a length of furnishing fabric from which a number of shapes have been cut, around lines in the pattern. These shapes have been filled in by sections of toning fabrics. The top edge is bound with thread made fabric whilst the bottom edge is faced with a toning gathered ruffle.
 IMAGE 15 (SIZE each sample A4)
This is section 3 of Chapter 8 .The translation of one of the designs into a textile sample. I chose to work on the bottom design of image 5 and this is repeated below.
 IMAGE 16 (SIZE A4)
  Timings for samples
 IMAGE 16 (SIZE A4)
The backgound fabric was a stiff black fabric and this was worked over in a grid pattern of fine machine zig zags to replicate the original design pattern made by crayoning over a plastic grid.
The flower shapes were cut out of felt and a central section was then cut from each felt shape. The outer 'petals' and inner centres were then covered by space dyed fine ribbon which was couched down in lines around the shape. Once covered these felt/ ribbon shapes were embellished by hand sewn, button hole stitch edging in gold thread. The same gold thread was then used to from a radiating pattern out from the centre of each circle. A needle lace edging was then worked in gold thread around the edge of each of the smaller centre circles. the hole in the centre of the outer ring of petals was then filled with circles of wadding to pad out the shape and this was then tacked into place. The covered inner circles were then placed over the wadding and the needle lace edging was pulled down over the sides of the wadding and stitched into place around the edges of the centre circles.'Lazy-daisy' stitch petals were then worked into the centres. The outer edges of each of the flowers were then stiffened with a fine wire being sewn in on the reverse.
The green leaves were worked on a double thickness of pale green organza, sandwiched with Bondaweb. Each leaf was wired down its central vein and the wires were left trailing so the they could be used to secure the leaves to the backgound with satin stitch stems. Small gold flowers were then stitched into the backgound fabric between the larger flowers and leaves and the centres were filled with a fancy lurex yarn.
The edges of the sample were decorated with very fine hair -like strands of wire.
 Timings for samples
Paper /paint original designs 8 hours
Fabric samples 24 hours
Textile sample from original design 12 hours
Photography, typing etc 6 hours.