Saturday, 19 March 2011

MOD 5 Chps4 & 6

CHAPTER 4 MAKING HOLES. IMAGE 1 SIZE A3 In the top sample, shapes were cut from layers of bonded organza . The top voids were filled in by metallic thread stitching while the bottom voids were filled by thick rayon shaded thread stitching. Although the voids were exactly the same size the ones filled with the lacy metallic stitching appear bigger in the sample. The bottom two samples were worked on fine cotton lawn layered over brown silk. In the left hand sample the shape was sewn around and the brown silk was then cut away from the reverse side. In the right hand sample the shape was sewn in the same way but this time the white cotton lawn was cut away to reveal the brown silk backing. IMAGE 2 SIZE A4 In the left hand sample a winged needle was used on the top row with a hem stitch and thick blue thread. Lines of dyed gummed silk were then worked over with the same needle and thread. The holes between the lines of silk were made by the winged needle but without any thread in the machine. In the right hand sample a grid shape was sewn using a triple straight stitch on muslin. The muslin was then cut away around the grid lines. IMAGE 3 SIZE A3 The left hand sample uses dyed scrim stitched in a grid pattern with a winged needle. In the blue sample the dyed scrim has been treated with wax and additional threads pulled prior to stitching. The white sample uses layers of undyed scrim , stitched in a grid pattern and then slashed. IMAGE 4 SIZE A4 An oblong of red wool boucle was used with small rectangles of a variety of dyed colours of tissue fragments sewn behind. The red fabric was then cut back and either folded , frayed or rolled to reveal the backing colours.
IMAGE 5 SIZE A4
In this sample lengths of merino wool have been teased apart into a grid pattern and the intersections secured with rayon thread.
IMAGE 6 SIZE A3
At the left hand sided dyed and waxed scim has been used and a pattern has been stitched and cut out.
In the centre top an orange/ red silk has been used a the top in a slashed pattern to reveal the red reverse side. In the bottom orange/red sample the same fabric has been used but every other warp thread has been removed. The reamaining threads were then teased out in a 'slashed' pattern across the weft threads. The top right is the frayed /slashed muslin sample.
The bottom right is a fabric made from a fringed yarn sewn to a nylon net background. The fabric was then slashed from the back between the lines of stitching.
IMAGE 7 SIZE A3.
This sample used a sample of silver/black/grey and white silk lurex as a background.In the centre of the sample is a rectangle of white copy paper with a graphite rubbing made over lolly sticks. Holes were then punched around the edge of the paper and threads frayed from the warp of the background fabric were then threaded through in an arching pattern.
Buckle shapes were cut from black card and these were then either threaded or backed with other black/grey and white fabric pieces. Small diamonds of black and silver silk lurex were then added to the corners.
IMAGE 8 SIZE A3
The top sample has been made from black card. A small square of blue foiled card was then cut and placed in the centre of the backing card. Eyelet holes have been punched in the centre and eyelets inserted. Strands of purple mohair wool were then threaded through the eyelet holes and then were spread out in a 'sunray' pattern. A small triangle was cut out of the background cardboard at each corner and small pieces of silk were then stitched into place behind. Narrow blue silk and velvet ribbon was then wound into notches cut in the corners of the blue foiled card and threaded through holes punched in the black card.
The bottom sample has been worked on painted handmade paper. This was then overlaid with three jewellery making spokes of wire, secured through holes by open silver metal beads and thick silver metallic thread. A series of holes was then punched around the curves of each of the painted shapes. These were then wound in patterns with the silver metallic thread and sequins and beads were used for further embellishment.
IMAGE 9 SIZE A3
In the left hand sample a number of circles of different colours of nylon organza were bonded together at the edges on to a backing of dyed and waxed scrim. Triangles were then cut to differing depths around the circle and folded back to reveal the different colours in the 'sandwich' The tips of the triangles were then melted to fuse them to the edge of the circle. In the centre, some triangles of organza remain while others have been completely folded back to reveal the scrim layer. Fine 'ribbons' were then cut from the organza trimmings and melted/ fused onto the background in the centre of the circle. The sample was then edged in concentric cirles with an automated machine stitched pattern.
In the right hand sample a square of dry needle felted fabric was formed from synthethic mohair and metallic threads. The sample was then teased apart at the edges to leave a lacy border of irregular shapes holes around the firmer felt centre.
IMAGE 10 SIZE A3 
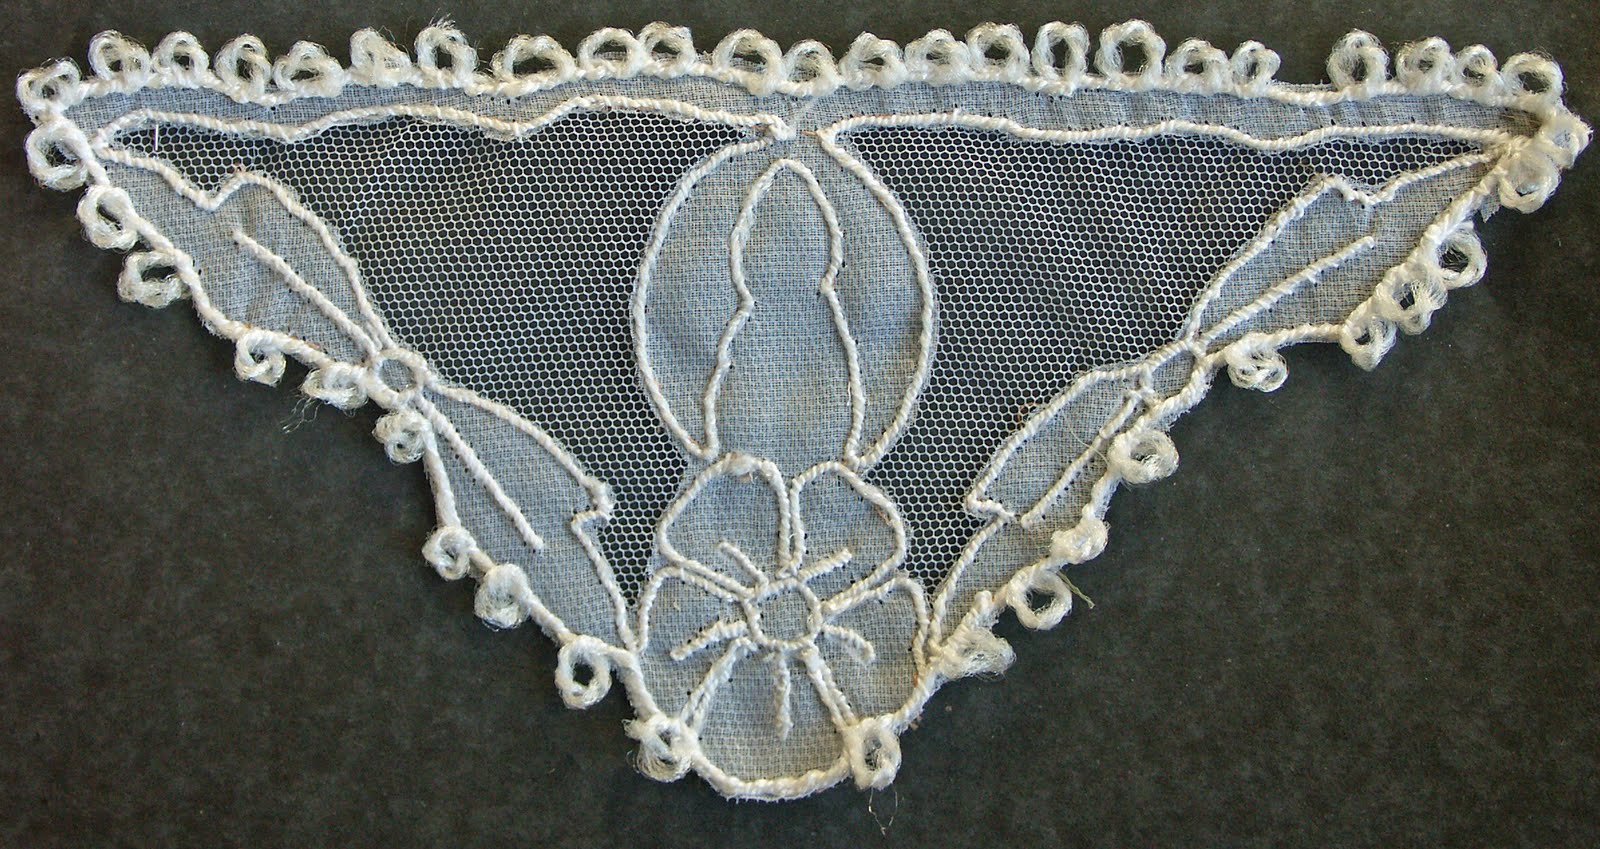
In the left hand sample dyed scrim has been worked with a number of patterns of holes to form butterfly shapes. The right hand sample continues the butterfly theme with a variety of methods used to cut butterfly shapes out from the varying layers of the backgroud and to reapply them giving positive and negative formations and a 3D effect.
IMAGE 11 SIZE A3
The top black and white sample has been formed from melted loops of white organza bonded on to a narrow stitched ribbon linking thread.
The bottom left sample has been made from bonded organza and foil fabric shapes being bonded onto a square of turquoise acrylic.
The right hand sample has been formed from two squares of stencil film being bonded together over some dyed threads of gummed silk and silk boucle. The edges of the suare were then cut into by a hot wire and threads woven into the resulting notches. Holes were then melted with a wide tipped soldering iron through all the layers where the threads formed curving patterns.
IMAGE 12 SIZE A3
Layers of fabric were stitched in diagonal lines behind a piece of furnishing brocade and backed with hessian. The resulting fabric was then slashed back to the hessian layer. In some places the motifs in the top fabric were slashed through and, in others , they were left intact. The edges of the layers were then brushed and teased out by a wire brush.
CHAPER 6 SILK PAPERS
IMAGE 13 SIZE 12INS X12 INS
This sample was designed to give some of the transparent/ translucent feel of water. The silk fibres were therefore dyed in a variety of weak dye solutions and then placed in a very fine layer, giving a papery feel to the resulting sample.
The silk threads were overlaid by wavy lines of a fine fringed metallic yarn in increasing depths of indentation.
IMAGE 14 SIZE 12 INS X12 INS
This sample retains the 'water' theme but was designed to be much more robust in feel and construction. The silk fibres were therefore dyed to much deeper colours and dyed silk rods, velvet and silk ribbons were added to the mix.
IMAGE 15 SIZE 8 INS X 8 INS.
In this sample two undyed silk hankerchiefs were used to form a sandwich for a series of blue and cream machine embroidered butterflies resulting in a very delicate , fragile silk fabric.
IMAGE 16 SIZE A4
This sample again used silk handkerchiefs as the underlying fabric but thick layers of throwsters waste in gold and black were then placed over the top. The first layers were glued down with CMC but then the net top sheet was removed before the sample was completely dry and further layers were added which were not re-glued. This gives a loose feel to the resulting fabric and leaves silk threads hanging from the surface.
The sample was then stitched over with skeleton leaves, black organza petal shapes and black beads. A machine embroidered black and gold butterfly was then added as decoration.
Time taken 17 hours.

Monday, 14 March 2011

Further design work 3rd assessment piece

IMAGE 1 SIZE (16INS x13 INS) Painted fabric background. IMAGE 2 (SIZE A3) Textured paper experiments I used a variety of papers and methods to achieve textures and various degrees of transparency within paper shapes and cut outs . On the left, narrow strips of painted paper were threaded through dyed nyon mesh in the top shape while, in the bottom shape, wider strips of painted paper were overlaid with the painted nylon mesh. In the long sample, to the right of the above , painted papers were formed in a curving wave shape at the top and then overlaid with nylon mesh in deeper wave shapes. At the bottom the paper was put through a crimper to create wave shapes. Again, moving right, the top sample was formed by winding strips of painted tissue paper around kebab sticks, removing the sticks, and then gluing them on to a painted paper background. Below this, scraps of painted tissue were torn off and glued on to a painted paper background. Along the bottom, glue trails were painted and applied. On the far right of the sample ,at the top, abaca fibre was painted and glued over pencils to form rolling wave shapes. Once the glue was partially dry the pencils were removed. Underneath this are two more painted tissue paper samples , one with horizontal and one with vertical 'waves' formed in a crimper. At the bottom right a tissue paper sample has been formed into a curve and glued on to from a 3D shape.
IMAGE 3 (SIZE A3)
Dyed thread experiments
This image shows a variety of threads dyed in the proposed colour scheme of the proposed piece to be comprised of sail shaped panels. IMAGE 4 (SIZE 16 INS x 13 INS)
Embroidery method experiments
The dyed threads from the image above were used to experiment with a number of textured embroidery stitches ( echoing the paper experiments) which could be employed in working the sail shaped panels.
Working from the top left these include----
Novelty cotton and silk yarn couched down in zig zags.
Below this ribbon has been used to cover piping cord to create rolls.
Below the ribbon sample is couched gummed silk and curly Wensleydale wool .
The final sample, at the bottom left, is formed from ribbon and mohair yarns stiched to folded painted bondaweb. This has been partially covered by stitched, painted and waxed scrim with pulled threads to give greater transparency.
Across the embroidery experiments there are a number of differing uses of this scrim fabric,some flat stitched and some in curving 3D shapes .
Moving to the right across the sample there is silk noile yarn worked in curves of whipped backstitch.
Below this is a small square sample using commercial stranded yarns worked over cocktail sticks which were then removed after stitching.
Slightly to the right and below this are bands of dyed silk boucle yarn couched down in a rectangle.
Below this the dyed felted cotton boucle yarn has been used to form a boat shape with an openwork scrim sail.
At the top right of the samples, Tussah silk has been threaded through painted nylon mesh.
Below this strips of painted handmade paper have been overstitched with dyed cotton viscose and lurex yarn.

Sunday, 13 February 2011

design plus Mod5 Ch1-3

PANEL DESIGN ADDITIONAL THOUGHTS/COLOURS Following on from your comments on my proposed design for my third assessment piece I have done some more work around the central idea. IMAGE 1 SEA SCAPE IN LAVENDER ON SMOOTH AND ROUGH PAPER IMAGE 2 SEA SCAPE IN PALER BLUE/ GREEN COLOURS ON ROUGH AND SMOOTH PAPERS.
IMAGE 3
SEASCAPE IN GREENS AND LAVENDERS ON ROUGH PAPERS JUXTAPOSED
IMAGE 4
LAVENDER/ROUGH SEASCAPE CUT IN SAIL SHAPES
IMAGE 5
PALE GREEN/BLUE ROUGH SEASCAPE CUT INTO SAIL SHAPES
IMAGE 6A
PALE GREEN AND LAVENDER ROUGH PAPER SAIL SHAPES INTERLEAVED
IMAGE 6B SAME COLOURS BUT ADDITIONAL SHAPES ADDED.
IMAGE 7
GREEN/BLUE ROUGH AND SMOOTH SHAPES INTERLEAVED
IMAGE 8
LAVENDER ROUGH AND SMOOTH SHAPES INTERLEAVED
IMAGE 9
GREEN/BLUE AND LAVENDER ROUGH AND SMOOTH SHAPES INTERLEAVED
Having worked through these further combinations a number of things come to mind.
A combination of rough and smooth surfaces gives a greater depth to the design
A combination of lavender and green/blue pale/deep tones gives greater interest to the design.
A panel with 8/9 pieces/sail shapes has more impact than one with 12/13 which tends to be over fussy.
If, in working the design, each sail shape is double sided / dual coloured and moveable that would give the most potential combinations
A way of working the panel could be to mount each double sided sail shaped piece on a fine metal rod set within a frame rather like an abacus with the metal rods running vertically rather than horizontally. this would allow the design to be flexible and movable.
Image 9 is , at present , the closest design to encompass the above thoughts.
CHAPTER 1
IMAGE 10 SIZE A2
HISTORICAL / CULTURAL STUDY OF STITCHED AND LACE LIKE STRUCTURES
STITCHING IN THE AIR
IMAGE 11 SIZE A2 HISTORICAL AND CULTURAL STUDY CONTINUED METHODS
SUSPENDED AND STITCHED/VOIDED SHAPES
IMAGE 12 SIZE A2
3RD SHEET OF LACE STRUCTURES INCLUDING RIBBONS , CUT WORK, SHEERS AND SUSPENDED SHAPES.
ADDITIONAL DETAILS/ PICTURES OF LACE LIKE STRUCTURES ARE INCLUDED IN THE STUDY OF ITALIAN EMBROIDERY PREVIOUSLY SUBMITTED IN MODULE 4. CHAPTER 2
STITCHERY TO CREATE SUSPENDED FEATURES
WORKING WITH REMOVABLE GROUNDS IMAGE 13 SIZE A5
This sample was worked on soluble 'romeo' film. The solid shell shapes were made separately using quilt wadding covered with white cotton net and then pinned to the background.The elongated shell shapes were made by placing patterns of acrylic string on the film and sewing over them using a zig zag satin stitch. The surface of the solid shells was sewn over by lines of straight stitching on to the film. The shapes were joined by a white fringed thread being counched down with machine stitching across the surface of the film. IMAGE 14 .SIZE A5
This sample was worked on dissolvable paper. The edge was formed by a narrow white nylon ribbon formed into rolling wave shapes and sewn down onto the paper. A silk boucle yarn was then machine couched down in sail shapes below the 'rollers'. Some of the paper was then dissolved using a stencil brush along the lines of the stitching.
IMAGE 15 SIZE A5.
This sample was assembled on thermoguaze, similar to vanishing muslin.The large motif was made from crochet cotton and then mounted on to the background. I made the three small fan shaped motifs using a lacy patern on the sewing machine worked on the thermogauze .The fans were stitched by hand to the edges of the crochet. The whole was then surrounded by a number of rows of silk boucle stitched down by machine on to thermogauze and through the edges of the individual motifs.
IMAGE 16 SIZE A5
This sample was worked within an embroidery frame on soluble embroidery stabiliser and represents limpets clinging to the crevices in rocks. The limpets were worked individually on cotton muslin using a variety of fancy yarns and perle thread.
The thick lines of the 'grid' were made by using a number of small lengths of braid, stitched onto the stabiliser background. The lengths of braid were then connected by lines of zig zag stitching worked diagonally acoss the surface. In some sections the stabiliser was dissoved completely while, in others, it was left in place to give support and edging to the zig zag stitching.
The limpets were then hand stitched in place.
USING HEAT TO MELT AWAY BACKGROUND
IMAGE 17 (SIZE A4)
'REED FRINGES'
This sample was worked on nylon net and a fabric was created by weaving and stitching a variety of fancy and fringed yarns into the mesh of the nylon net.
Once the fabric was complete sections of the still exposed net were melted away with a broad tipped soldering iron.
IMAGE 18 SIZE 15 INCHES X 12 INCHES
Sea Creatures
This sample was worked on a McCullough and Wallis glue fabric similar to bondaweb. Individual motifs were worked and placed on the background. These comprised two jellyfish (top left and bottom right) Other shapes were made including shells and soft bodied sea creatures.Lengths of trailing threads were left in place at the finished edges of each of these elements Once the composition was arranged across the glue fabric the trailing threads were used to connect each of the 'creatures' together.The whole sample was then ironed between two pieces of baking parchment. Following this a variety of tips on the soldering iron were used to melt away sections of the glue fabric. An area was left in place at the lower half of the sample to demonstrate different effects which can be achieved by partial removal of the background.
IMAGE 19 SIZE A5
Glue trails laced together and coloured with acrylics.
IMAGE 20 SIZE A5
Red coloured glue spots used to connect sequins across the voids of a black fabric used previously to cut out discs.
IMAGE 21 SIZE A5
This sample used squares of fabric which I had previously created. These included felted samples, stitched fancy thread samples and fabric made by gathering, partially melting/ scruching and painted embroidered silk.
The fragments were linked by wave- like glue trails which were subsequently painted.
STITCHING AND THREADING SAMPLES
IMAGE 22 SIZE A4
FISH.
The fabric for the fish was made by dying a range of white yarns in various colours of blue procion dye. The number of colours achieved was greater than the number of dyes used as the threads took up the dyes at differing rates. The lengths of thread were then ironed on to the glue fabric used in image 18. A template of a fish was made and placed on the fabric. The outline was then made in fine wire sewn in place by a machine satin stitch and each individual fish was cut from the background.Fragments of the fabric were used for eyes ,with the addition of a collection of beads. A lurex thread was stitched into place between the fishes tails and the individual fishes were stitched together at the widest part of their bodies. The wired shapes of the fishes were then moulded into a wave like motion and monted on black card.
IMAGE 23 Size a4
BUTTON SAILS
In this sample a series of triangles were attached to strips of fabric by the addition of buttons in toning colours.
IMAGE 24 SIZE A5
The lavender/purple background to this sample was made from a painted, dried out, wet wipe. The central section was made by threading nylon garden string through the mesh taken from oranges and lemons consumed at Christmas. The sample was then covered by florists film which was melted into place by the tip of the soldering iron.
CHAPTER 3
SUSPENDED SHAPES USING STITCH METHODS. IMAGE25 SIZE 7 INCH RING
The top two images are positive and negative structures . Top left are fragments of fine vilene and paper with punched holes arranged and stitched into an assembly. Top right the resulting punched discs are arranged into a petal-like structure.
Moving clockwise down the right hand side there is a heart shape. This was made by pinning three thickness of the background fabric cut into a heart shape to the reverse of the background net. The resulting shape was then surrounded by buttonhole stitch through all the thicknesses. French knots were then worked in row across the surface. At the bottom are two stitch patterns worked in heavy rayon yarn to float on the surface of the background net.
IMAGE 26 SIZE 12 INCH RING Muslin was used to line a 12 inch ring and this was then painted with white acrylic in a series of shapes connected to my main theme.
A variety of methods were then used to created shapes to suspend above the background.
The shell shape (top left) was cut from a number of thicknesses of nylon organza over polyester wadding. The shape was then scored into , at varying levels, with a very fine tipped soldering iron. At some places the tip went right through all the layers while, in others , only the top surface was marked. Some of the deeper cuts were outlined in silk boucle while others were left merely as score marks. Semi circles of yarn were worked across the shell shape and seed beads were used to decorate the surface in the way in which deposits often cling to the outer edge of shells.
Immediately to the right of this shell a fne nyon ribon was gathered onto fine white wire and formed into rollers. Down the right hand side a further method of making rolling waves was used by utilising white acrylic string wound around a thicker length of wire.
In the centre of the ring, lengths of Tussah silk were couched on to the surface in the form of waves. Below and left of these a shell shape was made by using narrow satin ribbon on its edge sewn to the surface in a series of folds.
At the right of this an outline shell shape was edged with back stitch into which detached buttonhole stitches were worked. A white cotton yarn was then worked across , but above, the surface in the form of 'veins'.
The further shell shape at the bottom right was made from a loose weave cram boucle material cut to shape. This was then threaded by a fancy cream silk yarn to give added texture across the surface.
Finally I worked a machined butterfly on soluble embroidery stabiliser and attached this to the surface.
IMAGE 27 SIZE A4
STITCHED AND MANIPULATED METHODS
FLOWERS.
The background fabric is rubber boat shelf covering material (used to ensure crockery does not slide)
The background for each flower was cut from transparent florists film which was secured by partially melting it on to the rubber background.A variety of materials was used to form the flower petals
Top Row L-R
Eye make up remover pads,silk tops and beads surrounded by eyelets slotted into the backg round.
Fragments of antique lace and cream kid mohair topped with a hair slide
Beads of polystyrene packaging material topped with pearls.
Bottom Row L-R
Unbleached silk rod fringed and curved surrounding a silk brocade section of fine piping topped with cake decorating stamens.
Silk tops with a silk brocade fabric made into a flower bud , set in a cream petal shaped bead.
Merino wool tops and antique lace with a section of silk trod topped by an antique bead.
Further silk rod and pearls sample as at bottom left.
The flowers were then ' connected' with cream string and chain stitches as in many Elizabethan scrolling flower patterns
IMAGE 28 SIZE A5
A warp and weft framework was made over a wire rectangle and shapes were woven and stitched into it. Those parts of the background not caught by the stitching were then removed.
IMAGE 29 SIZE A5
Worked sample of Carrickmacross lace. The design was traced onto tracing paper and white net and whited organza were placed over the traced design. The design was made by couching a thick white thread down over the whole outline in a continuous sweep using a fine white thread . The thick thread was then used to form a picot edging. The tracing paper was removed and the organza cut back along some of the stitching lines to reveal the background net.
IMAGE 30 SIZE 10 INCH RING
BONDED AND FELTED MEHODS.
A fine nylon net was used as a background fabric. White merino wool tops were then needle punced into the background in the shape of a tree. The topmost branches were then machine emroidered with a pattern of small leaves. Some coloured threads were couched down to give greater definition to the design and these were then embroidered over by the the leaf pattern. Finally some brown'acorn' fabric beads were attached.
IMAGE 31 SIZE A4
A length of white cotton organdy was painted using a stencils of dragonflies and fish and jacquard fabric paints. The organdy was then sandwiched between two sheets of nylon organza one green and one blue which were very slightly bigger in size. The dragonfly and fish outlines were then emphasised by a triple straight machine stitching. Additional embellishments in the form of scales, eyes and wing markings were then hand embroidered.
The slightly differing sizes of fabric in the bonded sandwich give a raised/ bubbly effect to the surface.
IMAGE 32 SIZE A4
This sample combines a number of techniques.
White cotton scrim was painted with Jacquard fabric paints over a raised pattered stencil and then covered with wax to stiffen it. Once dry, threads were withdrawn and the scrim was stitched down one side to a pale blue nylon organza background fabric. Narrow sections of dyed silk rods were then threaded through the places where thread had been withdrawn and stitched to secure in place by the circular ends which had been cut from the rods.
Small lengths of toning space dyed ribbons were stitched together over bucram shell shapes and stitched into place. Fragments of darker blue thread fabrics were placed between the two layers and bonded onto the organza.
Discs of metallic fabric made for the previos module were then bonded into place across the top surface. An edging was made by stitching a fancy boucle mohair yarn onto fragments of another thread fabric made for the previous hydrangea study.This was stitched around the edge through all thicknesses to secure all the elements in place.
Bibliography
Tracy Franklin Contemporary Whitework
Dawn Thorne Transparency in Textiles
Butler and Trubshaw Carrickmaross lace.
.
Timings For Chapters 1-3 and additional panel design work 80 hours
Visits/ talks etc
Annette Morgan Contemporary Quilts
Art Van Go Gallery and shop.
Costings ( Art Van Go treats not necessities £150)Silk Screen for printing, fabric dyes, devore paste soluble film,paper, thermogauze. scrim, organdie. Fabric paints,pencils